Welcome to the Maserati Khamsin Registry…
MASERATI KHAMSIN EURO BUMPER CONVERSION
EURO BUMPER KIT INSTALLATION PART TWO: THE REAR
Most
of the work here concerns the Euro rear bumper installation; the
Euro rear glass and light positioning take mere minutes.
Again make sure battery is disconnected.
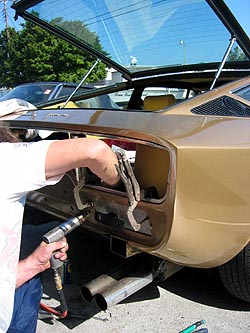
| Step 1: Remove the huge rear US bumper by unbolting it; there are two bolts underneath. Use caution, as it is ridiculously heavy. After removing the bolts pull the bumper towards you and off the car (suggest using it as diving platform for your pool, yacht or sending to Ralph Nader with a thank you NOT note!). | 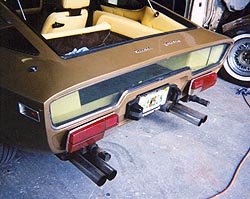 |
|
Step
3: Peel back the small metal strips that hold the
rubber in place. |
 |
 |
 |
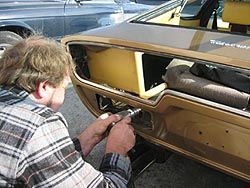
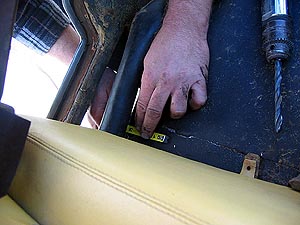
| Step
4: Unscrew the tag/number plate and its frame, with
lighting. Disconnect the electrical wires, [indexing them precisely
for ease of reinstallation], set aside. Note
that this operation is rendered easier the more trunk trim
you remove. On my car we cheated somewhat, dodging around
some of the trim such as the large rear box sections which
border the trunk on the left and right side. While this is
a little more time consuming we advise removing all leather
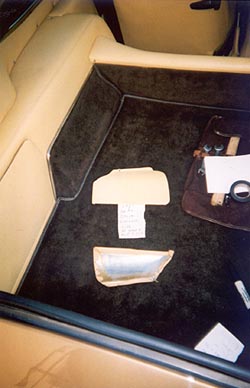
covered trim behind the rear seats, setting it carefully aside,
noting where each piece and screw fits, taping each screw
on the back of the part by its assigned screw hole for ease
of re-assembly. Note order in which you remove the trim pieces
so that you may refit them later in proper reverse order.
If you are planning to redo the leather interior of your car
this is the perfect time. |
| Step
5: Peel back carpet and under carpet towards the
front of the car.
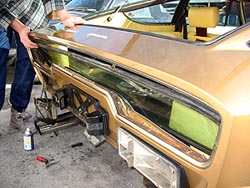
Step 6: Remove leatherette which hides frame under rear glass by pulling it off (it is glued on), unscrew frame brackets which hold the glass in place at each end on the inside of the trunk. Note that there is no need to remove the chrome trim, which holds the glass in place from the outside. Using plenty of WD40 gently tap the glass out of place towards the inside of the car, being careful not to damage the rubber gasket.
Step 7: You must now remove the long thin trim panels which are located just inside and below the glass opening. Set them and their screws carefully aside.
|
|
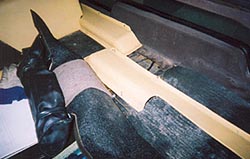

| Step
8: Disconnect the wires, carefully labeling them to
avoid incorrect rewiring later (believe me be as precise as
possible: I incorrectly rewired my left rear light and it decided
it wanted to be a Christmas tree every time I indicated to turn
left, so had to pull it apart again to rewire it properly!)
Set the lights aside out of harm’s way, labeling them
left side and right side as they were on the car. The black
adapter surrounds which were between the rear lights and the
body are now redundant, as are the plates which held the lights
on place on the inside of the body; store them with US bumpers
and other paraphernalia. Yes; more dead weight. Bring
the rear light wires upwards to their general intended location. |
 |
 |
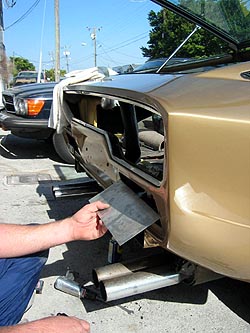
| Step
9: Prepare sheet metal plates to close off the rear
light holes in body. Rust proof them, position them, if possible
with clamps, mark where you will rivet them in place, (no need
to weld). Do not rivet them in place yet. You will need to cut an opening in these new sheet metal panels, roughly in their center, for the bracket to pass through, however it is easiest to mark this spot and to cut an opening towards the bottom. Doing this will allow you to fit them from the inside of the car after you tighten the brackets to bumper nuts, which you will do once the brackets at their other end have been attached to the trunk floor. Set plates aside. |
 |
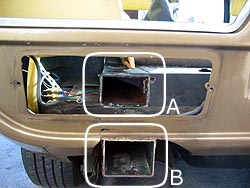 |
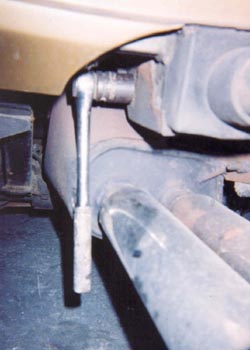
| Step 10: Peel the last layer of carpet padding up and away towards the front of the trunk, exposing the under floor of the trunk. Right in the center of the opening left by the removal of each rear light you will see the back end of a square section frame member (detail A). Cut out the rear “lid” that keeps it closed. Further inside there is another partial intrusion that needs to be cut off to allow for the rear bumper bracket to come in enough. Repeat on the other side. |
| Note that to do the right side you will have to disconnect the hose that goes from the fuel filler opening to the tank; seal tank opening and hose very tightly and carefully; exercise great caution due to the danger of fuel fumes (but without inflicting excessive torsion stress on what is likely old rubber) before continuing work. | 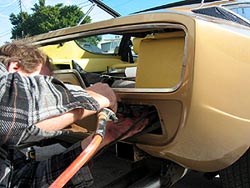 |
|
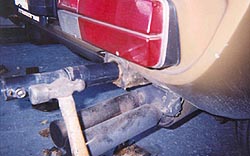
Using a plasma torch, a percussion tool or a small body shop saw (but not a torch unless fuel tank and all hoses have been removed), cut away these brackets. The whole purpose of this is to thereafter raise the exhaust mufflers and tips into the space you are clearing for them. Do not cut into chassis or body. The metal is quite thick, this is a gritty task, but soon enough will finish the task in a couple of hours and the heavy brackets will be history. The bracket on the right rear of the car has a hose which goes through it; this is part of the fuel tank; be careful around it. When you finish this, before going on to stage two of the exhaust muffler raising job, either re route this fuel line up and away from where the exhaust muffler will be or thoroughly wrap it in fire proof heat shielding material. Step 12: While the Euro rear bumper has seven bolts only the four (two at each end) that cater to the two brackets are relevant; you have a choice (the Khamsin is truly a car for independent thinkers!). The first solution is to cut off the three central ones flush with the surface of the bumper. They would simply attach to the body itself, not the frame and are therefore structurally useless in case of impact. The second solution is that, if you look carefully, the holes for these three bolts were in the body shell and plugged up for the US model; you can just tap these plugs out with a hammer and screwdriver. Just make sure that when fitting the bumper in place you use silicone, applied from the inside of the trunk, to prevent water and exhaust fume ingress. Which solution you choose is irrelevant, as long as you do it properly. Step 13: Attach the two brackets loosely to the rear bumper, with nuts or washers that prevent backing out. Now position the bumper and its brackets in place by inserting the brackets in the holes you cut out for them. Mark the spot where the bumper should be positioned (it should be close to the body but not touch it; 5 milimeters or 1/5 of and inch is about right). Make sure carefully that bumper position will be correct vertically, side to side and front to back; have a good photo of the back of a Euro car handy. |
 |
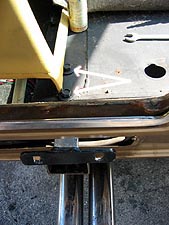 |
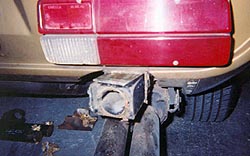
| Step 14: Once you are satisfied of the correct spots with the aid of a tape measure, mark them (there are two bolts per bracket detail A), procure the right bolts to thread into the brackets through the floor (make sure ahead of time that you have them handy). Drill the holes in the trunk floor, again be extremely careful as you are close to the fuel tank. Repeat on the other side. Note; these holes will be just under the lower end of the big box-like leather trim panel on each side of the trunk. As mentioned above you can either remove the trim panel completely or, unscrewing the screws that hold it onto the edge of the trunk floor, push it aside slightly while drilling, taking car not to damage the leather. Repeat procedure on other side. Set bumpers aside, position brackets in place loosely. Step 15: Now is the time to cut the hole in each sheet metal panels roughly in their center, for the bracket to pass. It is easiest to mark this spot and to cut an opening towards the bottom. Doing this will make it much simpler, allowing you to fit them from the inside of the car after you tighten the brackets to bumper nuts (which you will do once the brackets at their other end have been attached to the trunk floor). Set the plates aside for now. Step 16: Remove the brackets from the trunk, reattach the bumper loosely to them and mount the brackets and bumper in place. Tighten all bracket to bumper and bracket to trunk floor nuts gradually. Using shims of various thickness at the bumper end between the bumper and the nuts will allow you to achieve a consistent and adequate gap between the body and the bumper as you finalize its position, take your time doing this; it is important for an even fit but do not overtighten. Step 17: Now slide in the sheet metal panel. Rivet it in place along with the small extra piece that you cut to slide the panel in place around the bracket, closing off the hole as tightly as possible under the bracket. Repeat on other side. |
| Seal carefully with silicone, as you do not want exhaust fumes or rain to sneak into the cockpit. Get hold of your tag/number plate frame, reattach its light wires to it and secure it in place (the number plate gap is intended for a European tag; long and thin; the tall and narrow US tag will have to overlap the bumper so just secure it tightly with two screws at the top. Fit the fuel hose back in its place carefully. | 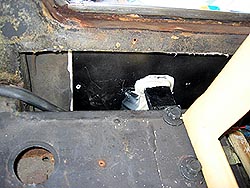 |